
Hello crafty friends! I am so happy to share a full video tutorial for you on how to use embossing powder! I start out with a simple guide for beginners, but then move into 6 different techniques you can use with embossing powder! Let's heat it up!
What is embossing powder?
Embossing powder is very fine ground up plastic bits (hence, powder) that you coat your stamped image with. When heated, the embossing powder turns into a gloss or shine for card making, scrapbooking & more! There are 3 main sizes of embossing powder: super fine, regular, and ultra thick. I have used the super fine and regular and like these sizes.

What do you need to use embossing powder?
You only really need 3 items when starting out with embossing powder.
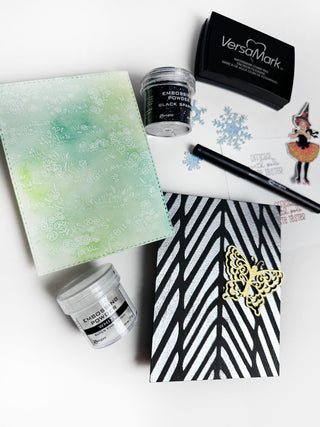
- Embossing Powder (of course!) there are a lot of colors and versions out there, so make sure to pick your favorites! I love the ones with a little bit of sparkle in them. You also can't go wrong with gold or silver!
- Heat Tool: I have a Chandler brand heat tool that I love and have used for years.
- VersaMark: There are different brands of this watermark ink pad, but you will need some sort of "VersaMark" in order to have something for your embossing powder to stick to. I've had mine for YEARS and have not had to replace it yet!
The Basics of Embossing Powder
Once you have your three products, all you need to do is grab a stamp and get started! Put your stamp into the VersaMark just like you would a regular ink pad. Once you get a nice coating on your stamp, you will press your image onto your cardstock like normal. Note that VersaMark is clear, so you won't necessarily be able to see it, but it is a bit thicker and sticky, so you can feel it when you stamp and you do see a little residue before putting the powder onto your cardstock. Next step, grab your embossing powder! Pour it over the stamped image/text. Remove the powder from the cardstock, as much as you can by pouring the excess back into the jar. Then I like to flick my paper with my finger to get any more excess off. Next, grab your heat tool! Now you heat the stamped & powdered image, until you see it turn from dull powder into an embossed shine!
Different Embossing Techniques
-
Embossing with Catherine Pooler Inks & Clear Embossing Powder to create shine with any ink color you'd like! This technique is a lot of fun because it's basically the same thing as regular embossing, but you can chose any ink color you'd like and emboss it! With this, I like to use my Misti so I can keep my stamp in place and restamp with VersaMark over my inked image in the same exact spot. First, stamp using the ink. Clean off your stamp, then stamp using the VersaMark. Add your clear embossing powder, heat set & then watch as your regular ink becomes a glossy ink! Try this out with any colors you have!

-
Emboss Resist: This technique is so fun and one of my favorites to use with embossing! First grab some white cardstock. Here is where I used my Card Sentiment Die (the A2 liner) so I could make a card base. I then had a beautiful 6x6 stamp from Hero Arts that I was so excited to use. It looks like grass & flowers. Stamp your regular way with the VersaMark on some white cardstock. Cover with white embossing powder & heat set. Once it's complete, grab your inks, and start to ink blend over the embossed image. The white will appear and RESIST the ink you use, creating a lovely background and a pop of white! This would be really beautiful also to use with a card sentiment as well. I love how this turned out and can't wait to make it into a full card design.
You can also use the Emboss-Resist technique with water coloring! Be sure to use watercolor paper, then grab your inks & use them to watercolor. You can see a great video I did of this technique HERE.
-
Embossing Pens for Detailed Images: Ranger has embossing pens which I LOVE using to get that extra detail in an image that you don't want completely embossed. The pack comes with a black pen & a clear pen, so you can use it with black embossing powder, like I did with my Halloween ephemera seen below. The clear is useful for different colors, the second image below shows a sun I stamped out in some Sauna ink, then I went through on some of the rays and touched it up with some gold embossing powder to really add that shine! I love using this technique. You can get really nice intricate detail with these pens.

-
Embossing Paper for Die Cutting: I just came up with this technique (I'm sure others have done this before), but I love it! Grab your VersaMark, and rub it on some white cardstock (direct to paper, like we do with our Catherine Pooler Inks). Then grab the embossing powder of your choice, here I used On The Lake for a pretty blue color, and heat set like usual! Now, you can die cut out any images you'd like. I did some snowflakes which I did on a recent card make. You can see a short video HERE of how I made these snowflakes for that specific card.

-
Embossing with Stencils: Grab your favorite stencil! Make sure your stencil is secured down, and grab your VersaMark. Press your VersaMark pad onto your stencil covering the whole surface area carefully. Remove your stencil, add your embossing powder & heat it up! This creates a beautiful image for scrapbooking, cardmaking & journaling. You can buy embossing daubers, but I find you can get the same effect with just your VersaMark pad if you are careful.

-
Embossing Chipboard: This has to be one of my favorite techniques. I recently learned this at a class I took and was so WOW'd by it I had to share! Grab any of your favorite chipboard, and use your VersaMark and press it into your chipboard. Grab some embossing powder (my personal favorite for this is the gold) and then heat it up! This makes such a beautiful effect, almost looking like jewelry! But light enough to put on a card for sure.


Surprise! I have one more I forgot to put in the video but still wanted to share it with you!
- Embossing with Crafty Power Tape: Did you know you can use Crafty Power Tape to emboss?? You can! I love doing this for cards, plus it gives you a perfectly straight line. Just take your Crafty Power Tape, and tape it down where you want your embossed line. Peel off the backing, and add your embossing powder. That's right, you don't need VersaMark here because the powder sticks right to the tape! Then heat set it and bam! You have a perfectly straight and sparkly line! This is such a great embellishment for whatever projects you have! I bet you could even do this with any double sided adhesive. Here's a short video on how I made this lovely sunflower fall card since I missed it in the full process video!

I hope this was educational for you no matter what level of cardmaking or crafting you are at! My main goal is to ease anxiety for people who want to craft, but maybe are scared to begin. I hope this helps. Please let me know what else you'd like to see! Thanks for stopping by!
With Heart,
Disclosure: Compensated affiliate links may be used above at no cost to you. I only show you products from companies that I believe in and purchase from personally. Thank you for supporting me so that I can continue to bring you lots of fun crafting content!


Bernie
Thank you for the cool email with the emboss resist in GOLD! I never would have thought of that. I guess I’ve always used clear. That opens up a whole new way to be creative!