
Hi crafty friends!! I am SOO excited to share with you all my first ever YouTube Hop with Catherine Pooler Designs!! I decided to make something special for this occasion, a multi-tiered box card! This card looks so impressive & complicated to make when in actuality, it's really quite simple!! Take a look at my FULL process video below to see how to make this card. After you watch my video, make sure you subscribe and leave a comment along all the hop stops for your chance to be the lucky winner of a $100 Gift Card to the Catherine Pooler Shop!
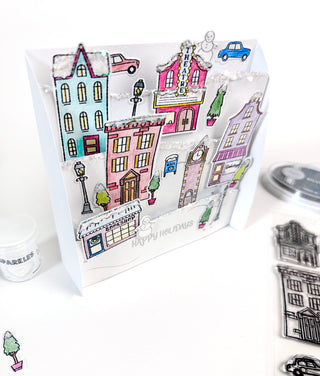
This card is so fun and impressive looking. I knew with the new Winter on Main Street stamp set collection I wanted to make a layered look for this card so I could feature ALL the stamps in this collection! My parents every year set up a Christmas village, and I definitely felt inspired by that. These stamps are so pretty and fun! First I started by stamping all the images onto some plain white cardstock & then just colored with some colored pencils. You can of course use copics, that's just not something I've invested in yet!

I also used the Sparkling Sugar glitter on the snowy bits of the die cuts, I really felt like this added some pop! Now, let's create the base of our card! First, trim some paper down so you have a base of 10 & 1/4 inches by 6 inches wide. From here, you will want to score the base at 2 & 1/4 inches & 8 inches. This will make a sort of box for you. Now let's make our layers!

For the layers, they each will be 6 & 1/2 inches wide. Then, you will also score these pieces 3/8 inches & 6 & 1/8 inches. Make sure they are different heights to create those layers. I made three for this card. It was perfect for each of the stamps to create my own little village. My first & smallest layer, I stamped the "Happy Holidays" sentiment in the NEW Silver Metallic Ink! This ink is so fun, it reminds me of an embossing powder that you don't have to heat set!

Before adhering each of the layers onto your card base completely, you will want to decorate each layer. I'm making sure when I layer the houses you can see each one & they don't get covered up. I used some sparkling sugar on the edges of each layer also to create the effect of snowy hills!

I also trimmed down my edges of my main box base so it felt a little more open.

And here's your multi-tiered card! You can add a separate piece of cardstock onto the back for writing sentiments on. I just love the way this turned out. It's a lot simpler than it looks! Which is always nice, ha!

Don't forget to subscribe to my YouTube & all my other crafty friends for your chance to win a $100 gift card to the Catherine Pooler Shop!! All the details are in my YouTube video. Let me know what other fun cards you'd like to see!
With Heart,
Disclosure: Compensated affiliate links may be used above at no cost to you. I only show you products from companies that I believe in and purchase from personally. Thank you for supporting me so that I can continue to bring you lots of fun crafting content!


