Author: Emily Moore
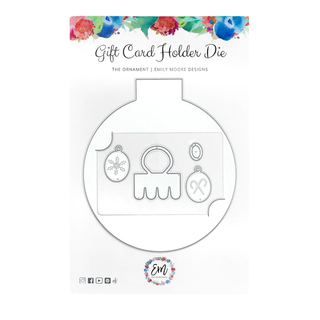
Hi fellow crafters! I thought I'd share a full blog post & tutorial all about how to use our Ornament Gift Card Holder Die. Not only that, but I wanted to give you more inspiration for decorating your Ornaments this holiday season! Below I have a full process video sharing step-by-step how to assemble the Ornaments & just two ways to "decorate" them. Keep scrolling to see the many different ways to create some festive & fun Ornaments that your family will be sure to remember!
First, I've created a little image to share the smaller pieces, the charms, loop & topper. The charms & loop are an additional touch, something you don't need to add onto your ornaments, but they just are so darn cute you're going to want to. The charm designs come in two, candy canes & a snowflake, which match our Christmas Sweater Layered Stencil Design for even more coordination!
I love using Gold or Silver Lunar Paste here on some cardstock before cutting out my charms & loop. This gives the effect of real gold or silver, which comes out truly stunning & almost realistic looking! If you are in a rush, you can omit the charms, but when designing the Ornament, I knew I wanted to add this special little touch for you all, that way you can choose!
As seen above, the loop goes through the hole on the charm, and then onto the topper. You then overlap the loop and glue it together once in place. The loop comes with a cut in it, so it's really easy for you to assemble! Once done, you can create your Ornament & put your topper with the charm onto your Ornament!
Click HERE to see a short video of how to add the charm onto your topper.
I like pairing my charms with glitter paper for the toppers to add a little bit of differentiation between the two, although sometimes a solid gold topper is the perfect striking look. See below for how I used the Gold Lunar Paste for both the topper & the charm. This went perfectly with the Christmas Sweater design on my Ornament!
In my video, I share how to create the above Ornament with an already stenciled out design, and also the below Ornament, which features some lovely patterned paper. I also double sided the charms, topper & loop on this one so you could either use the front or the back! This is a great way to utilize that double sided patterned paper.
Below I am featuring many more ways to decorate your Christmas Ornaments!
Alcohol Inks: In case you missed it! I did a Facebook Live on this technique & it's truly so fun! The Ornaments come out iridescent looking (like true painted ornaments) & really give a unique look. We still have Alcohol Ink Kits in stock if this is something you'd like to try!
You can find my blog post HERE that goes into detail about how to use alcohol inks, perfect for beginners!
Specialty paper: Using Specialty paper can be anything from glitter paper to decorative acetate. It's hard to tell in the photos, but below is an Ornament that features some red fuzzy paper - something your recipient will truly love! Plus our dies are strong enough to cut through all types of fun paper - give it a try!
Mixed Media: In the photo below, I used some rub-on transfers from 49 and Market, a Christmas version I had in my stash! Rub on transfers are fantastic because they add a nice design without adding any extra bulk to your projects. You can essentially create your own pattern or design this way! I also finished it off with some ink blending on the sides, white paint splatter, and a little chipboard in the corner that says "dear Santa".
Using Die Cuts/Embossing Folders: For this Ornament, I cut out a bunch of snowflake dies with an Adhesive Sheet on the back, then stuck them on the same colored cardstock. I then ran my Ornament Die through the machine with the snowflakes to create this super cool effect! You could also use an embossing folder, but the die cutting is a great option if you don't have the embossing folder you need. Plus, I just like this technique!
Patterned Paper: Like shown in the video (& spoke about above), patterned paper is definitely a fun option, especially if it's double sided! Check out two Ornaments below, one features the mini gift tag from our With A Bow Die Set (that also fits on the Ornament loop!). I also did the topper & charms double sided so you can use either side!
Other options: Using plain cardstock, like a favorite color or a stark red is also a fantastic option. In that same note, using inks and doing some ink blending or other fun inky techniques is a great idea! Here's an Ornament below I created by inking my own strips & using Crafty Power Tape to add some foil & glitter!
Another thing to note is that the Ornament once all assembled does fit in an A2 sized card, but more on an angle. I'd suggest a square or A6 sized card with a pocket if you wanted to gift with a card! You also can add ribbon to the topper and hang this on a Christmas tree! The total size of the Ornament once cut out, including the topper is 4 x 5.5 inches.
Let me know in the comments, any fun design ideas I missed?! How would you decorate your Ornament Gift Card Holders?
Thanks so much for stopping by, I love sharing all my ideas with you!
Lots of heart,
Emily


